Repairing Tools in Minecraft: The Complete Survival Guide
You're deep in a cave, just found a pocket of diamonds, and then it happens: your iron pickaxe breaks mid-swing. If you've been playing Minecraft for more than an hour, you've been there. Tools don't last forever, and in survival mode, losing a good tool at the wrong moment can feel genuinely painful.
The good news? Minecraft gives you several ways to keep your tools alive, from quick Crafting table fixes to the legendary Mending enchantment that essentially makes a tool immortal. Each method has its place depending on what stage of the game you're in and what kind of tool you're trying to save.
This guide covers everything you need to know about repairing tools in Minecraft, including which method to use, when to use it, and which tools are actually worth the effort. Whether you just built your first crafting table or you're optimizing a late-game XP farm, there's something here for you.
Understanding Tool Durability in Minecraft
Before you can repair a tool, it helps to understand why it breaks in the first place. Every tool in Minecraft has a durability value, essentially a hit counter that ticks down each time you use the tool. When the counter hits zero, the tool disappears completely.
Durability decreases by 1 point for most actions: mining a block, hitting a mob, using shears, and so on. Some actions drain more durability than others. Using a sword to break blocks, for example, costs 2 durability instead of 1, which is why you should always use the right tool for the job.
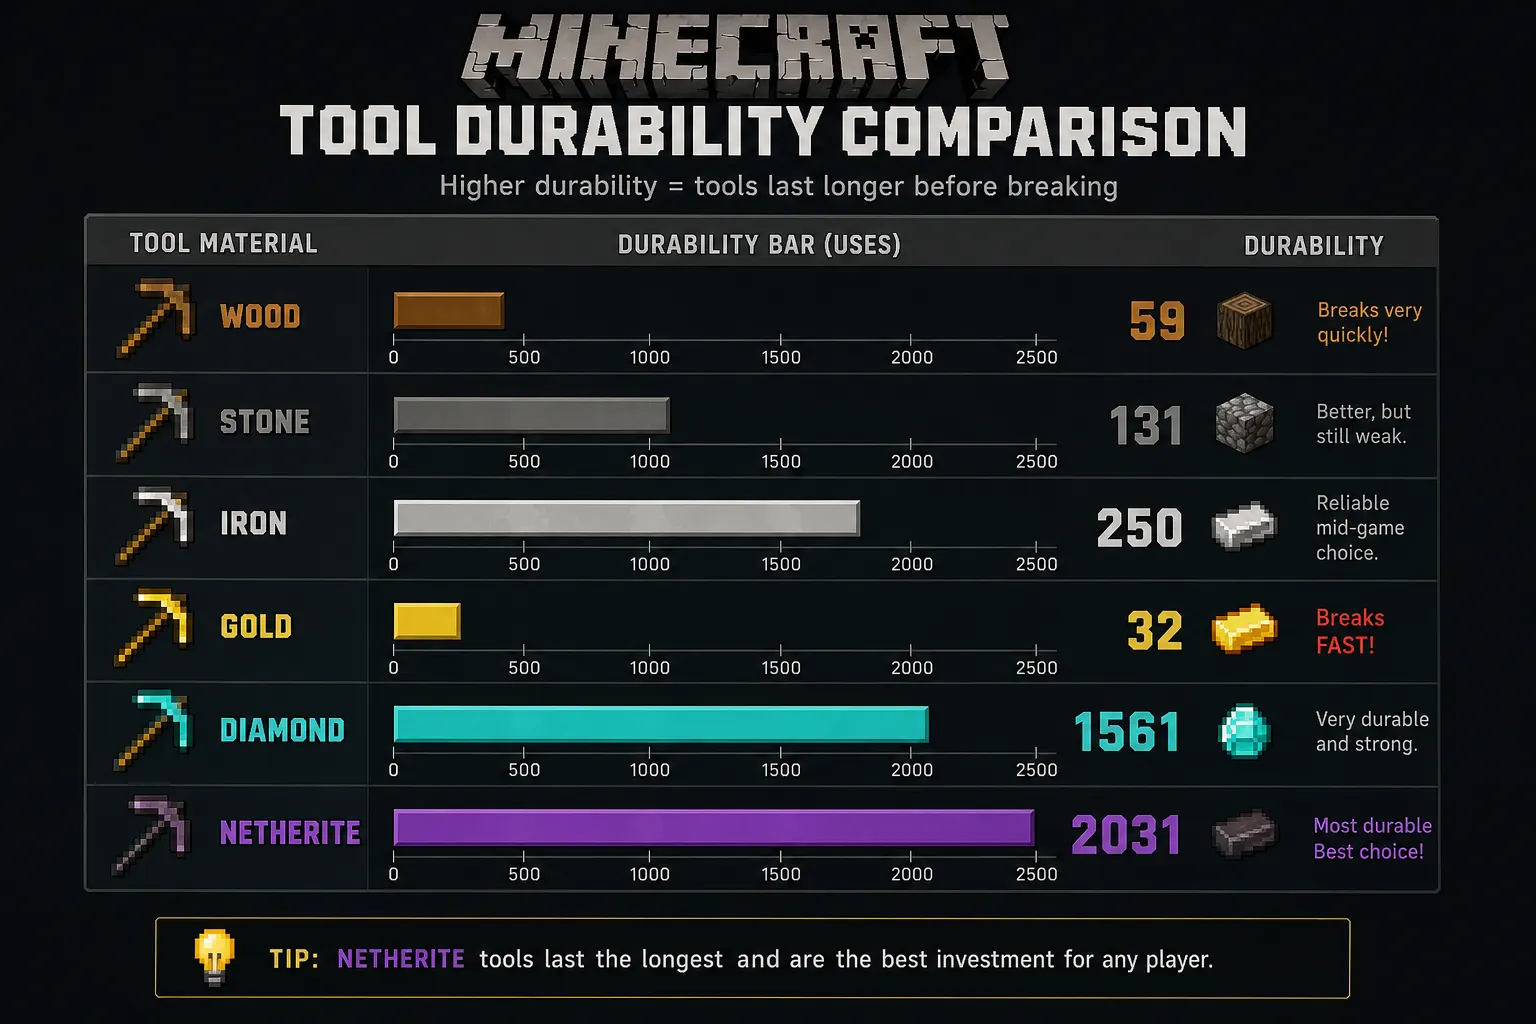
Minecraft Tool Durability Comparison Table
|
Material |
Durability |
|
Wood |
59 |
|
Stone |
131 |
|
Iron |
250 |
|
Gold |
32 |
|
Diamond |
1,561 |
|
Netherite |
2,031 |
A few things stand out here. Gold tools are shockingly fragile; they break faster than Wooden tools despite being made of a "precious" material. They mine quickly, sure, but you'll be replacing them constantly unless you use the Mending enchantment. Netherite, on the other hand, is nearly indestructible by tool standards and well worth every repair investment you make.
Knowing these numbers helps you decide whether a repair is worth it at all, something we'll come back to later.
Ways to Repair Tools in Minecraft
There are four main methods for repairing tools in Minecraft, each with different costs, benefits, and trade-offs. Let's walk through all of them.
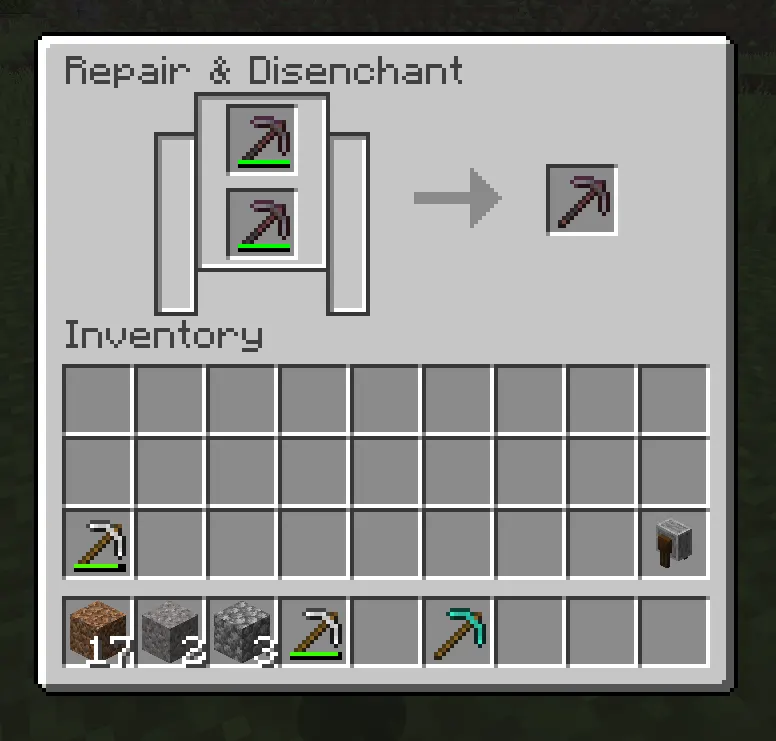
Repairing Tools in the Crafting Grid
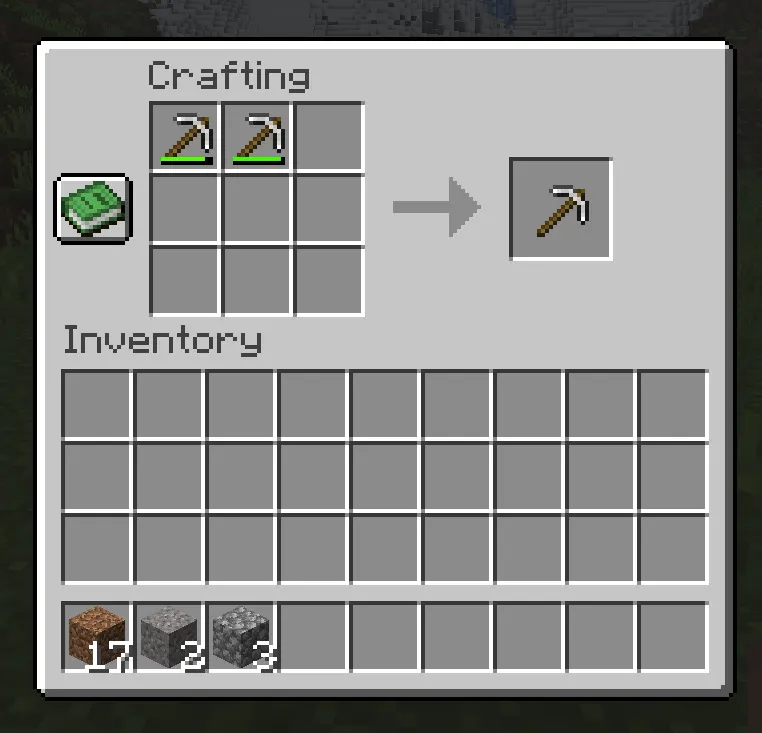
This is the most basic repair method and requires nothing more than a crafting table (or even your 2x2 inventory grid for some combinations).
How it works: Place two damaged versions of the same tool in adjacent slots in the crafting grid. The result is a single tool with a combined durability, plus a small 5% bonus on top.
Step-by-Step: Crafting Grid Repair
-
Open your crafting table (or inventory crafting grid).
-
Place two damaged tools of the same type and material in any two slots.
-
Take the repaired tool from the output slot.
Durability Calculation:
New Durability = Tool 1 Durability + Tool 2 Durability + (Max Durability × 0.05)
So if you combine two iron pickaxes each at 100 durability, your result has 200 + 12 = 212 durability (5% of 250 is 12.5, rounded down).
The big catch: Any enchantments on either tool are completely removed. That's a deal-breaker for anything beyond the earliest part of the game.
Best Use Case: Early game, before you have access to anvils or valuable enchantments. If you have two beat-up wooden or Stone tools with no enchantments, combining them is a smart move to avoid wasting a new craft.
Repairing Tools Using an Anvil
The anvil is where things get interesting and expensive. It allows you to repair tools using raw materials or by combining two tools, and crucially, it preserves enchantments.
How the Anvil Repair Works
There are two ways to repair with an anvil:
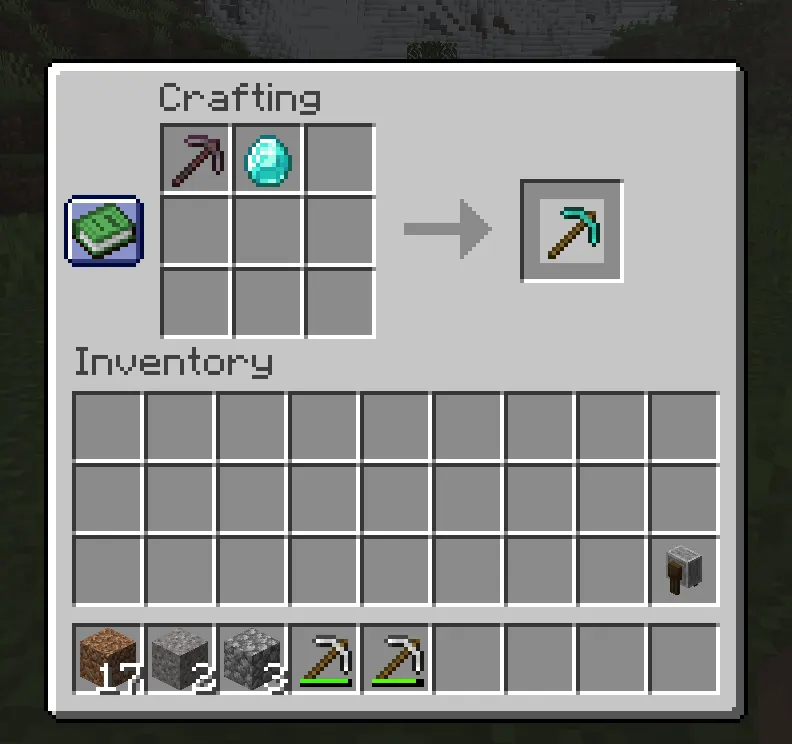
Method 1 — Repair with materials: Place your tool in the left slot and the corresponding repair material in the right slot. Each piece of material restores 25% of the tool's max durability.
-
Iron pickaxe → repair with iron ingots
-
Diamond sword → repair with diamonds
-
Netherite axe → repair with netherite ingots
Method 2 — Combine two tools: Place two tools of the same type in both slots. The output tool gets the combined durability and merged enchantments from both tools.
Anvil Repair Examples
Example 1: Repairing an Iron Pickaxe
-
Put your iron pickaxe (50 durability remaining) in the left slot.
-
Add 3 iron ingots in the right slot.
-
Result: Pickaxe restored to about 250 durability (full), costing roughly 3–4 XP levels.
Example 2: Repairing a Diamond Sword
-
Diamond sword at 30% durability + 2 diamonds.
-
Restores ~50% max durability per diamond used.
-
Cost: Usually 1–3 XP levels, depending on enchantments.
Example 3: Combining Two Enchanted Tools
-
Pickaxe A: Efficiency IV + Fortune III
-
Pickaxe B: Unbreaking III + Silk Touch
-
Result: One pickaxe with all four enchantments (if compatible), at a higher XP cost.
Understanding XP Costs and Prior Work Penalty
The anvil charges XP for every repair, and the cost increases with each subsequent repair on the same tool. This is called the Prior Work Penalty. Every time you repair a tool on an anvil, the next repair costs more.
Once the repair cost hits 39 levels or more, Minecraft displays the dreaded "Too Expensive!" message and blocks the repair entirely. This is a hard limit in the game and cannot be bypassed (except with Mending, more on that in a moment).
Anvil: Pros and Cons
|
Pros |
Cons |
|
Preserves enchantments |
Costs XP levels |
|
Can merge enchantments |
Prior Work Penalty stacks |
|
Repairs with materials |
Eventually hits "Too Expensive!" |
|
Renames items |
Anvils degrade with use (Java Edition) |
Repairing Tools with a Grindstone
The grindstone is a block that sits somewhere between the crafting table and the anvil in terms of usefulness. You can craft it with two sticks, a stone slab, and two planks.
What the Grindstone Does
The grindstone has two functions:
-
Repair two tools — Combine two of the same damaged tools for a durability boost (same math as crafting grid, with the 5% bonus).
-
Remove enchantments — Strip all non-curse enchantments from a tool, returning some XP to you in the process.
The key thing to understand is that the grindstone does not preserve enchantments when repairing. If you put an enchanted tool in the grindstone to combine it with another, the enchantments are gone.
When to Use a Grindstone
-
You have an enchanted tool you no longer want (e.g., Silk Touch when you need Fortune).
-
You want to recycle some XP from unwanted enchantments.
-
You're repairing early-game unenchanted tools and don't have an anvil yet.
-
You want to remove a curse (like Curse of Vanishing) before using a tool. Wait, actually, grindstones cannot remove curse enchantments. Keep that in mind.
Grindstone: Pros and Cons
|
Pros |
Cons |
|
Free to use (no XP cost for repairing) |
Removes all non-curse enchantments |
|
Returns some XP from stripped enchantments |
Cannot remove curse enchantments |
|
Resets Prior Work Penalty |
Not suitable for valuable enchanted gear |
|
Easy to craft |
Less repair value than an anvil |
Repairing Tools with the Mending Enchantment
Here it is, the crown jewel of tool maintenance in Minecraft. If you've heard experienced players talk about Mending, the hype is completely justified.
How Mending Works
Mending is a treasure enchantment, meaning you can't get it from an enchanting table. It must be found, traded, or fished. When a tool with Mending is in your hand (or off-hand, or worn as armor) and you collect XP orbs, those orbs are automatically converted into durability on the Mending item instead of going into your XP bar.
The conversion rate: 1 XP point repairs 2 durability points.
So if you collect a 3-point XP orb, your Mending tool gets 6 durability restored. As long as you're collecting XP regularly from mining, killing mobs, smelting, and band reeding, your Mending tools essentially never break.
Why Mending Is Considered the Best Repair Method
-
No XP level cost — XP orbs repair the tool passively, without you spending levels.
-
No Prior Work Penalty — Mending doesn't use the anvil, so your tool's repair cost never increases.
-
Passive maintenance — Just play the game normally, and your tools stay healthy.
-
Works on all equipment — Pickaxes, swords, armor, elytra, tridents, anything can have Mending.
How to Get Mending
Getting Mending takes some effort since it's a treasure enchantment:
-
Villager trading — A librarian villager can offer a Mending book. Cure a zombie villager, set up a librarian with a lectern, and restock their trades until Mending appears. Lock the trade in by buying it once.
-
Fishing — With Luck of the Sea III on your fishing rod, the chance of fishing up a Mending book improves. It's still somewhat rare, but a solid AFK method.
-
Loot chests — Mending books can appear in dungeon chests, ancient city chests, mineshaft chests, and other loot sources.
-
Raids — Completing a raid occasionally gives Mending books as reward loot.
The librarian village method is the most reliable. Many veteran players set up a villager "trading hall" specifically to farm Mending books.
Best Tools to Put Mending On
Not every tool benefits equally from Mending. Prioritize it for:
-
Elytra — Extremely hard to replace, and they degrade with every second of flight.
-
Netherite pickaxe — Your most-used tool in the game.
-
Trident — Incredibly rare, can't be crafted.
-
Netherite sword — Used constantly in combat.
-
Netherite armor — Expensive to replace and takes a lot of damage over time.
Common Mistakes When Using Mending
-
Holding a Mending item while using a different tool. If your Mending pickaxe is in your offhand but you're mining with an iron pickaxe, the XP goes to the offhand Mending pick, not the iron one.
-
Using XP on leveling instead of repairing. If your Mending item is already at full durability, the XP goes to your levels normally, which is fine. But if you have a damaged Mending tool, don't spend those levels elsewhere.
-
Not pairing Mending with Unbreaking. More on this below.
Best Repair Method for Each Stage of the Game
Early Game
Use the crafting grid. You don't have XP to spare, you don't have an anvil, and your tools probably aren't enchanted. Combine two damaged stone or iron tools to stretch their lifespan. It's free and easy.
Mid Game
Use the anvil. You've built an XP source (maybe a mob farm or you're mining a lot), you're picking up useful enchantments, and you want to preserve them. Repair your iron and early diamond tools with materials to keep them alive. Start watching your Prior Work Penalty counter.
Also, start fishing or trading for Mending books during this phase. Even one Mending book reserved for your best pickaxe changes your game dramatically.
Late Game
Mending + XP farm = infinite tools. By late game, you should have a proper XP source, a Mob spawner farm, a gold farm in the Nether, a guardian farm, or a classic enderman farm. Pair that with Mending on your best tools, and you'll never worry about durability again. Anvils become mostly useful for combining enchantments during initial setup, not for routine repairs.
Repairing Enchanted Tools

Repairing enchanted tools on an anvil is powerful but requires careful planning to avoid the "Too Expensive!" wall.
Tips for Avoiding "Too Expensive!"
-
Apply enchantments in the right order. Each anvil operation adds to the Prior Work Penalty. Plan your enchantment sequence ahead of time to minimize the number of anvil uses.
-
Use books, not enchanted tools, when possible. Combining two enchanted tools stacks their individual prior work penalties. Applying an enchantment book to a tool only adds one level of penalty.
-
Enchant the tool first, then repair it with materials. Get your enchantments on early, then top up durability with material repairs, not tool combinations.
-
Add Mending early. Once Mending is on a tool, you can mostly stop anvil-repairing it altogether, which prevents the penalty from climbing.
Example: Building a Perfect Diamond Pickaxe
-
Enchant pickaxe: Efficiency IV + Unbreaking III (anvil use 1)
-
Add Fortune III from a book (anvil use 2)
-
Add Mending from a book (anvil use 3)
-
Repair durability with diamonds if needed (anvil use 4, watch your cost)
-
After this, never use the anvil again; let Mending handle the rest.
Common Repairing Mistakes
Even experienced players fall into these traps:
-
Wasting diamonds on bad tools. Don't diamond-repair a pickaxe that's already been anvil-repaired four times. The cost will be sky-high, and you're just delaying the inevitable "Too Expensive!" message.
-
Ignoring Mending. Players who don't seek out Mending end up burning through resources and XP on anvil repairs indefinitely. One Mending book changes everything.
-
Repairing wooden or gold tools. Wooden tools have so little durability that repairing them is never efficient. Gold tools are the same. Just craft new ones.
-
Accidentally removing enchantments with a grindstone. Don't put an Efficiency IV pickaxe in the grindstone "just to repair it a little." You'll lose the enchantment and deeply regret it.
-
Forgetting the offhand Mending trick. Mending items in your offhand also collects XP, great for repairing your elytra while you're doing other tasks.
Best Tools Worth Repairing
Absolutely Worth Repairing
-
Netherite pickaxe — The backbone of your resource gathering. Always repair it.
-
Netherite sword — Especially if it has Looting, Smite, or Sharpness.
-
Elytra — Irreplaceable without hunting another End City. Mending is practically mandatory.
-
Trident — Can only be obtained from Drowned mobs and is extremely rare. Protect it at all costs.
-
Diamond tools (pre-Netherite) — High durability and expensive to replace. Worth maintaining.
-
Fully enchanted armor — Protection IV Netherite chestplate with Mending? Repair it forever.
Usually Not Worth Repairing
-
Wooden tools — 59 durability max. Just craft new ones.
-
Stone tools — Cheap to make and low durability. Not worth the anvil costs.
-
Gold tools — Faster but fragile. The material cost to repair one is higher than its worth unless you have Mending already on it.
-
Unenchanted iron tools — Borderline. If you're struggling for iron, a crafting-grid repair is fine, but don't use an anvil on them.
Tool Repair Tips for Survival Mode
Here are some practical habits to build early that will save you a lot of pain later:
-
Always carry a backup tool. Keep a spare iron pickaxe in your hotbar. When your main tool breaks mid-mining session, you won't be stuck.
-
Use Unbreaking III alongside Mending. Unbreaking III gives your tool a 70% chance to not lose durability on each use. Combined with Mending, your tool rarely needs to be repaired at all the durability barely drops.
-
Build an XP farm as early as possible. Even a basic mob spawner converted into a grinder dramatically improves your ability to enchant and repair. Skeletons and Zombies are ideal.
-
Don't repair at full durability. Mending XP only repairs up to 100% if your tool is already full; the XP goes to your levels (which is fine, but be aware). Avoid "wasting" Mending opportunities.
-
Save your best enchantment books. Found a Mending or Fortune III book, but don't need it right now? Chest it. Don't slap it on a random tool just because you can.
-
Name your best tools on the anvil. This is purely a quality-of-life move, but it also prevents you from accidentally tossing your named diamond pickaxe into a grindstone.
Java vs Bedrock Repair Differences
For the most part, repairing works the same in both Java and Bedrock editions of Minecraft. However, a few small differences are worth knowing:
-
Anvil degradation: In Java Edition, anvils physically degrade over use (from Anvil → Chipped Anvil → Damaged Anvil → destroyed). In Bedrock Edition, anvils do not degrade with use — they last indefinitely.
-
"Too Expensive!" threshold: Both editions apply the 39-level cap, but some players report minor differences in how prior work penalties accumulate for certain enchantment combinations. The core mechanics are the same.
-
Mending priority: In Java Edition, if you have multiple Mending items equipped, XP orbs repair one at a time (randomly selected). In Bedrock, the priority system works slightly differently — it prefers the item in your main hand. Keep this in mind when managing multiple Mending items.
-
Grindstone UI: Functionally identical across both editions.
Conclusion
Repairing tools in Minecraft isn't just a mechanical chore — it's a core part of surviving and thriving in the long run. Here's a quick summary of when to use each method:
-
Crafting grid → Early game, unenchanted tools only.
-
Grindstone → When you want to strip and recycle enchantments, or do basic no-XP repairs.
-
Anvil → Mid-to-late game, when you need to preserve or merge enchantments.
-
Mending → The endgame solution. Get it as soon as possible and never worry about tool durability again.
The single best piece of advice for any survival player: seek out Mending early, build an XP farm, and pair Mending with Unbreaking III on your most-used tools. Do that, and your gear will outlast every dungeon, every Nether fortress, and every dragon fight you throw at it.
Now get back out there — those diamonds won't mine themselves.