
How to Make Torches in Minecraft
Quick Answer
To make a torch in Minecraft, place 1 coal (or charcoal) directly above 1 stick in your crafting grid. This gives you 4 torches instantly, and you don’t even need a Crafting table; your 2×2 inventory grid works perfectly.
Torches are one of the first things you craft in a new Minecraft world, and they're one of the last things you stop needing. That's a rare quality in any game. From your very first cave exploration to lighting up a massive base in the late game, torches are a constant — cheap to make, easy to place, and genuinely critical for survival if you're playing it properly.
Most players learn the basic recipe in their first session and then never think about it again. But there's a lot more going on with torches than just "place coal on a stick." Light mechanics, Mob spawning thresholds, torch variants with different properties, placement strategies that actually save resources — this guide covers all of it, so you're not just placing torches randomly and hoping for the best.
Why Torches Matter More Than You Think
Before getting into the crafting, it helps to understand what torches actually do in the game engine because "they make things bright" undersells it.
In Minecraft, every block in the world has a light level assigned to it, ranging from 0 (complete darkness) to 15 (maximum brightness). That number changes based on what light sources are nearby and how far away they are. Torches emit a light level of 14, and that value drops by 1 for every block of distance in any direction, so a block one step away from a torch is at 13, two steps away is at 12, and so on.
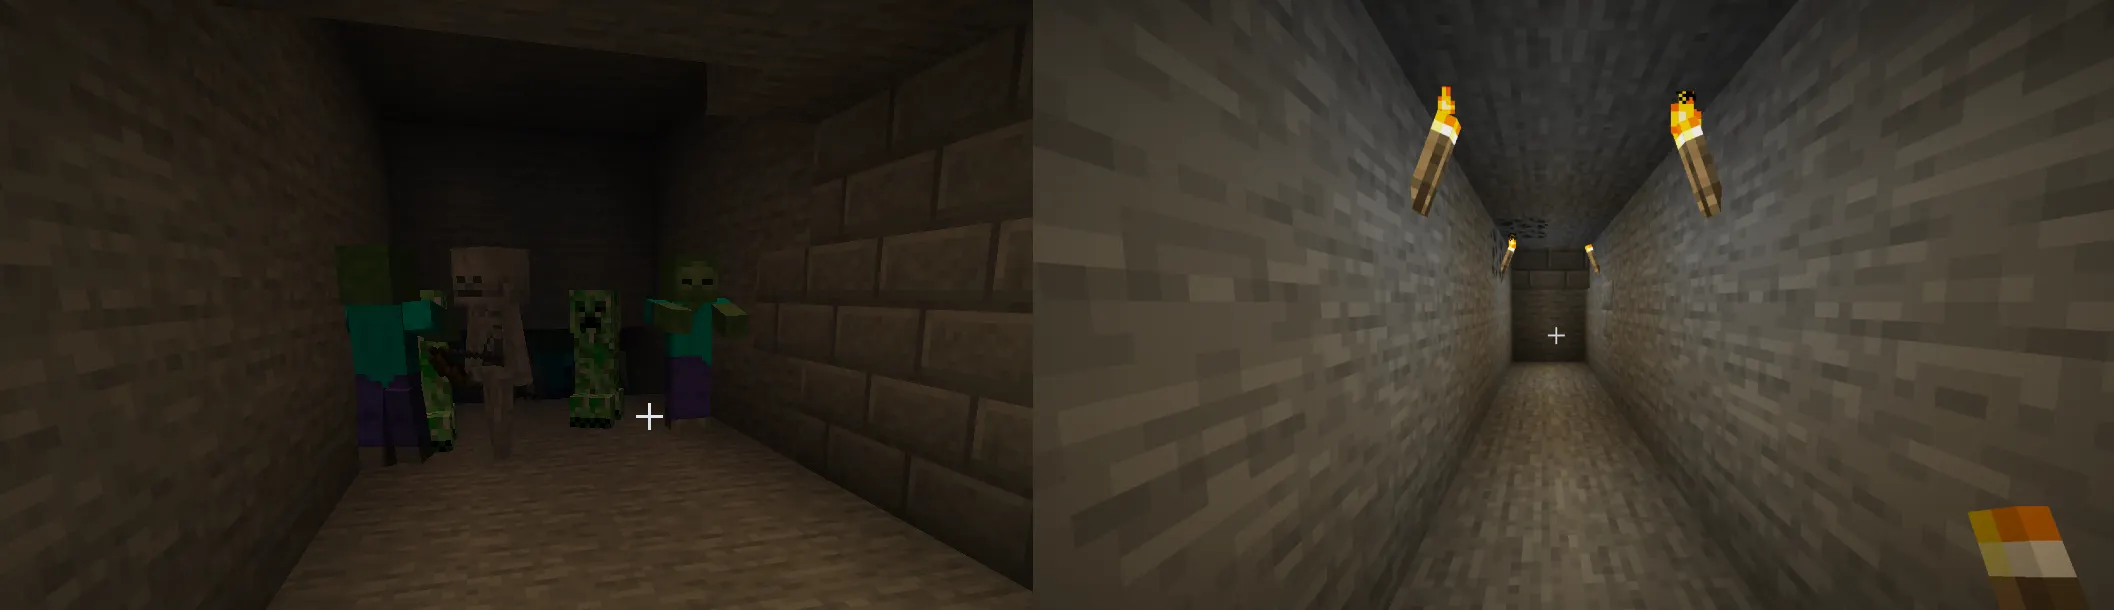
Here's where it matters for survival: Hostile mobs, creepers, zombies, skeletons, and spiders can only spawn on blocks where the light level is 0. Light up your surroundings properly, and those spawns stop happening. Stop them from happening consistently, and your base, your farm, your mine, all of it becomes dramatically safer.
Players who don't understand this end up frustrated. They build a base, it looks lit up, and mobs still spawn in a corner somewhere. Usually, it's because they placed torches based on how bright things look visually rather than where the actual light-level gaps are. This guide helps you avoid that.
Torches also serve a secondary purpose most players overlook: navigation. Underground, every tunnel looks the same after a while. Experienced players use torch placement conventions to track which way leads back to the surface, which branches they've already explored, and where they left off. More on that later.
What You Need to Craft a Torch
The recipe is two materials: a stick and either coal or charcoal. That's it. The simplicity is the point; torches are meant to be easy to produce in large quantities from very early in the game.
Sticks
Sticks are the most available crafting material in the game. Two wooden planks stacked vertically in any crafting grid give you 4 sticks. Wooden planks come from any type of wood log — oak, birch, spruce, jungle, acacia, dark oak, mangrove, bamboo, or cherry. It doesn't matter which wood type you use; the sticks are identical.
One log gives 4 planks, and 2 planks give 4 sticks. So one log = 4 planks = 8 sticks. And since one stick makes 4 torches when paired with coal, one log effectively fuels 16 torches on the stick side. Sticks are never a bottleneck.
Alternatively, dead bushes drop sticks when broken, and bamboo can be crafted into sticks too (2 bamboo = 1 stick in Java Edition). Witches sometimes drop sticks when defeated. You'll never actually run out.
Coal
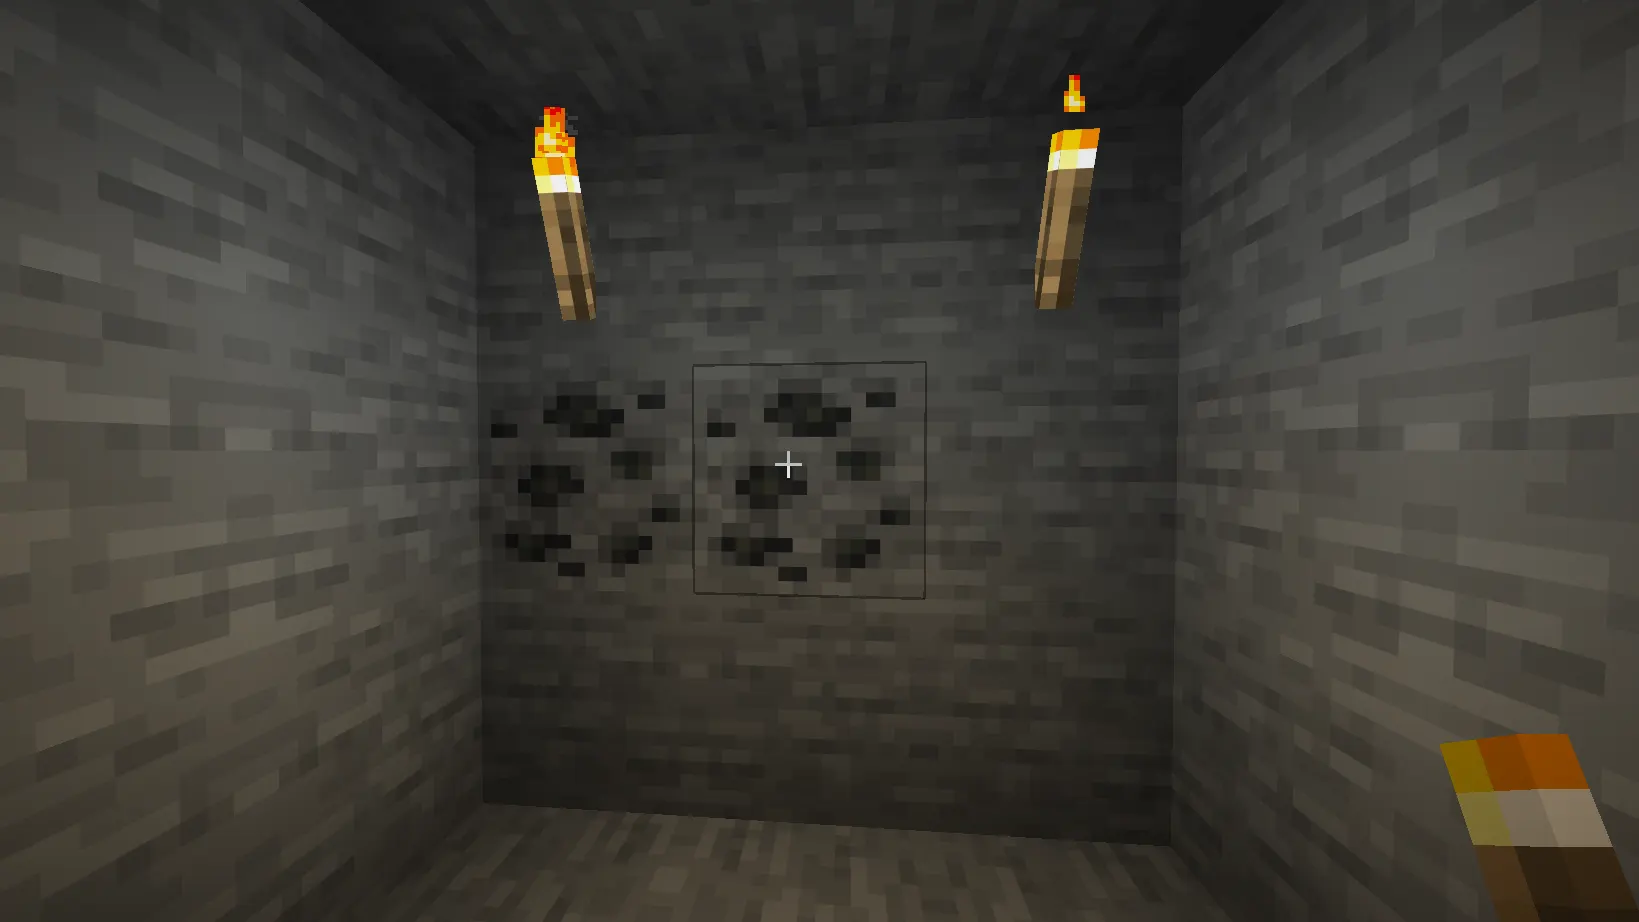
Coal is the standard fuel for torches, and the one most players go for first. It appears underground as coal ore stone blocks with black speckled deposits in them. Coal ore generates in large veins between Y levels 0 and 320, with the highest concentration at Y=96. Early game, you'll find it within the first 15–20 blocks of digging underground, usually before you hit anything interesting.
You can mine coal ore with any pickaxe, including a wood one — the material level doesn't matter for coal. When mined without a Fortune enchantment, each coal ore block drops 1 coal. With Fortune I, you can get up to 2. With Fortune III, each ore can drop up to 4 coal. If you're setting up serious torch production later in the game, mining coal with a Fortune III pickaxe is genuinely worthwhile.
In caves and cliff faces, coal is often visible on exposed walls without any digging. It's the most common ore in the game by a wide margin. Most players have dozens of them within the first 20 minutes of a new world.
Coal also generates inside chests in village buildings, mineshaft chests, dungeon chests, ancient city chests, and various other structures. If you're not finding it underground right away, exploring a village is a reliable shortcut.
Charcoal
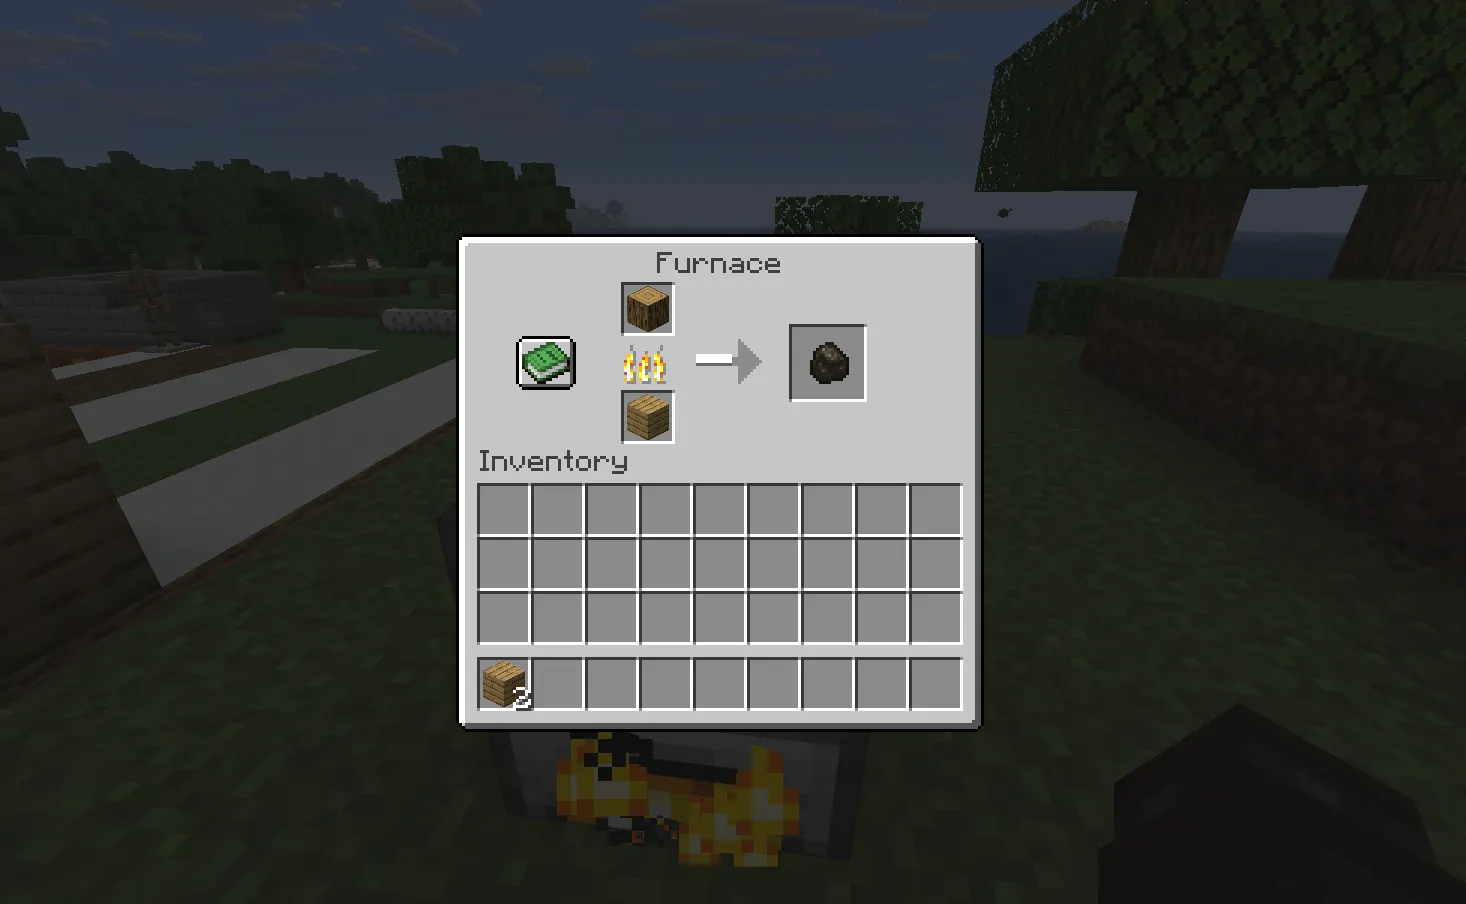
Charcoal is coal's exact substitute for torch crafting. Functionally identical — same recipe, same output, same torch behavior. The difference is how you get it: you smelt wood logs in a Furnace. Any log type works. Put a log in the top slot of a furnace with any fuel source in the bottom (planks, another log, sticks, anything burnable), and it smelts into one charcoal per log.
The reason charcoal exists is to give players a path to torches when coal isn't accessible yet. If you spawn in a world surrounded by jungle or dense forest with no exposed stone nearby, you can still have a full stack of torches within a few minutes by chopping wood and smelting it.
One thing to watch: charcoal looks nearly identical to coal in your inventory. The item names are different if you hover over them, but the icons are basically the same dark color. If you mix them in a chest, you'll have a hard time telling them apart. Some players keep them in separate inventory slots just to stay organized, especially if they're tracking fuel efficiency.
Soul Sand / Soul Soil (For Soul Torches)
If you plan to craft soul torches, you'll need soul sand or soul soil — both found in the Nether's Soul Sand Valley biome. No Overworld source exists for these, so soul torches are inherently a mid-to-late game item that requires you to build a Nether portal first. More on soul torches in a dedicated section below.
How to Craft Torches: Step-by-Step
Using Your Inventory Crafting Grid
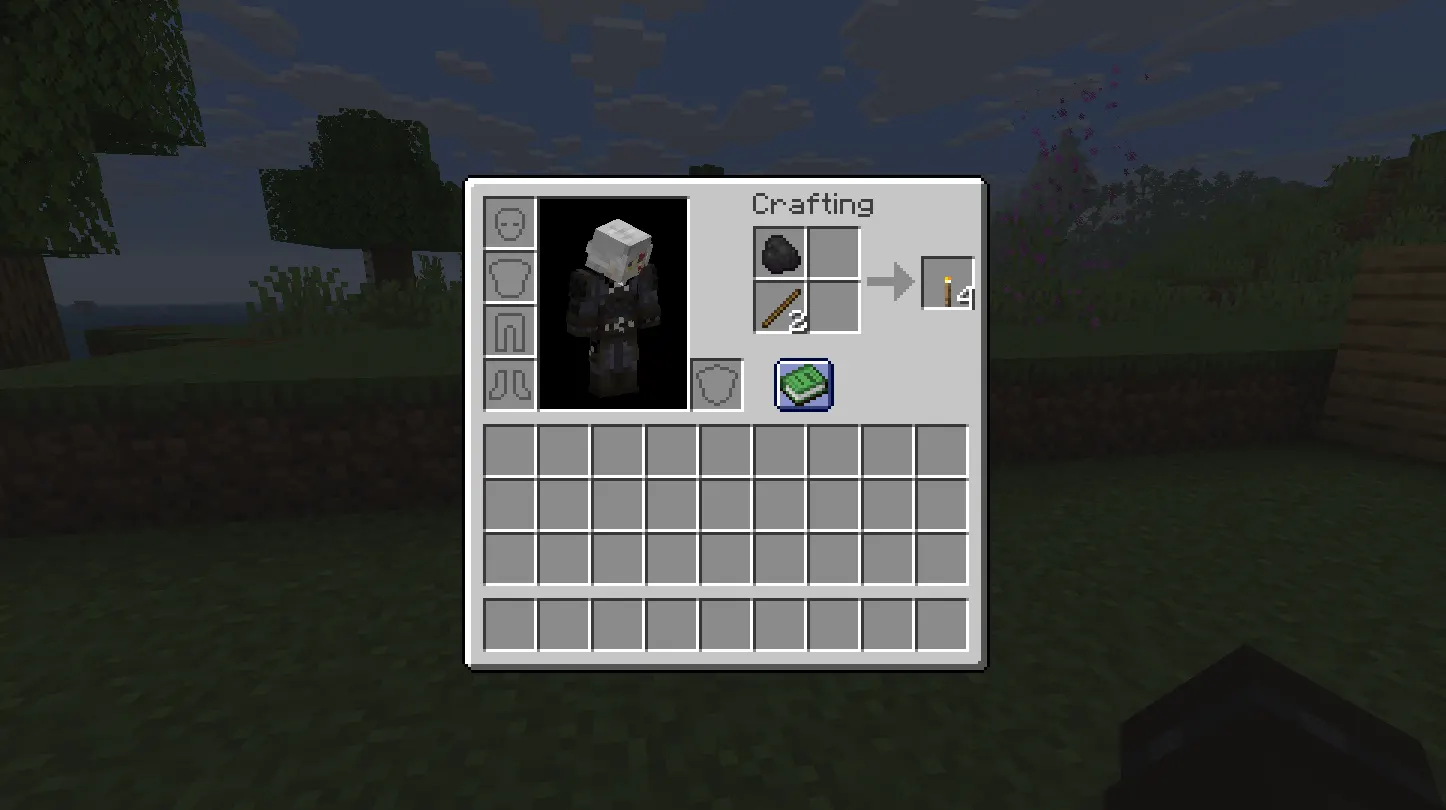
This is the most important part that many beginner guides skip over. You do not need a crafting table to make torches. The recipe fits in your personal 2x2 inventory crafting grid, which you access by pressing E (default on Java Edition).
Recipe layout (2x2 grid):
Place the coal in the top-left slot and the stick directly below it. The right column stays empty. Drag the output (4 torches) into your inventory.
This matters in practice because it means you can make torches the moment you have the materials, even before you've set up a base or crafting station. When you're deep underground and running low, you don't need to surface — if you have coal and sticks in your inventory, you can craft torches on the spot.
Using a Crafting Table
The same recipe applies to the full 3x3 crafting table grid — just use the top slot for coal and the slot directly below for a stick. Same result: 4 torches per craft.
The crafting table doesn't offer any advantage for this specific recipe since it fits the 2x2 grid. But if you're batch-crafting and have other items organized on the table already, it's convenient to do everything in one place.
Bulk Crafting Tips
If you need a large number of torches quickly:
-
A full stack (64) of coal + 64 sticks = 256 torches. That's 4 full stacks. More than enough to light an entire mine system.
-
Don't bother keeping only a few torches on hand. Make them in large batches when you craft them, because you'll always use more than you expect.
-
When smelting charcoal, you can run multiple furnaces simultaneously to produce charcoal faster. Three furnaces running at once triple your charcoal output rate, which matters if you're trying to light a large area quickly.
Every Torch Type in Minecraft
Regular Torch
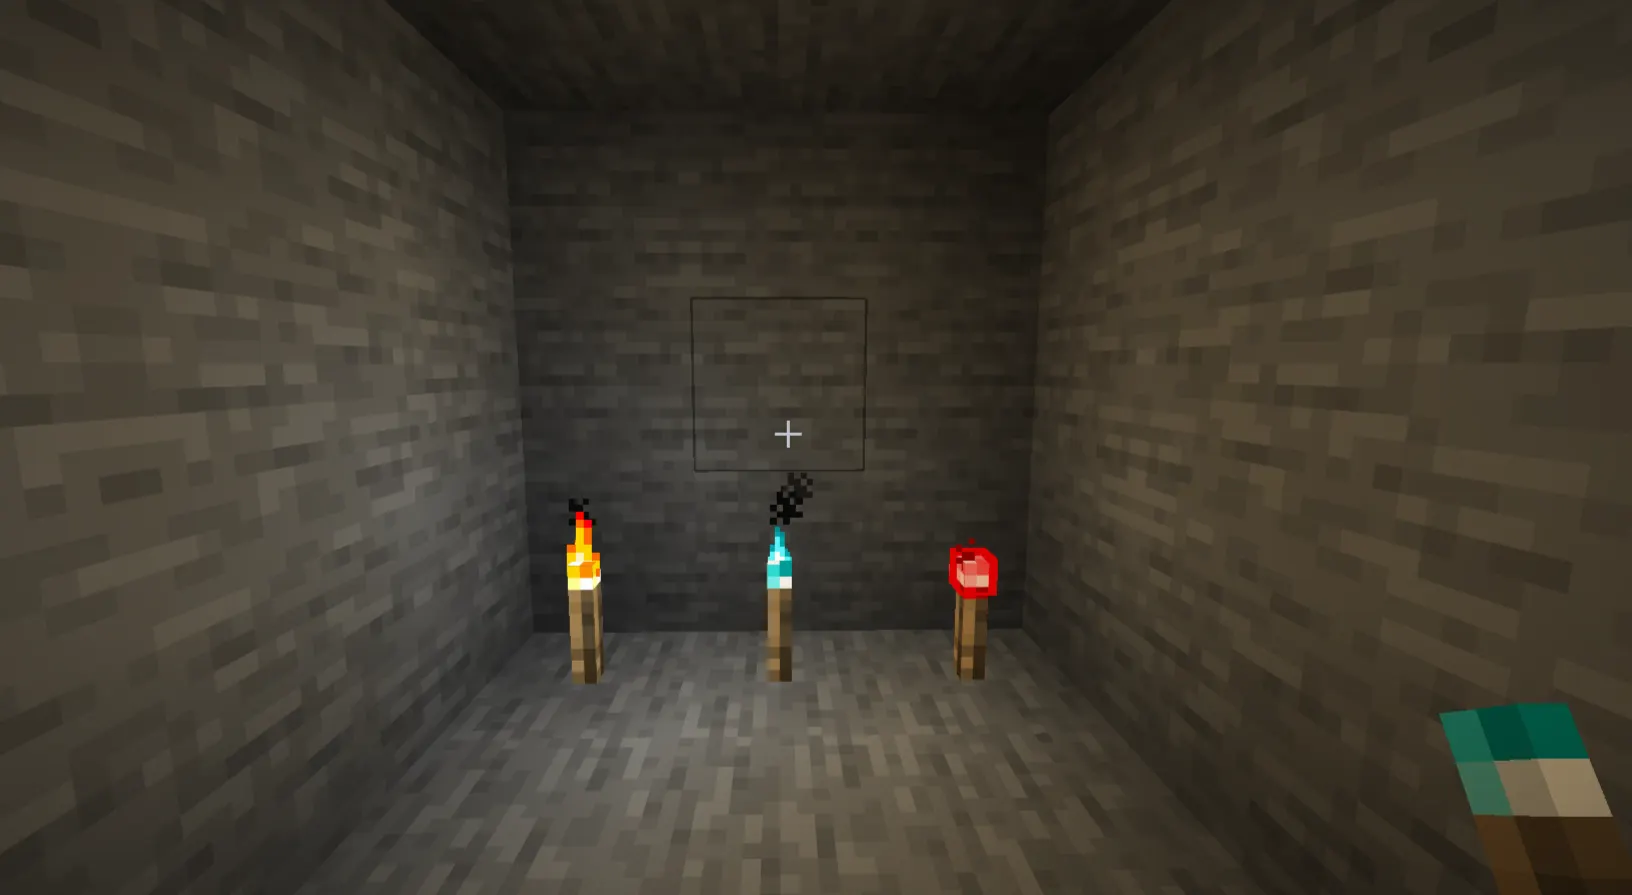
The standard version. Made with coal or charcoal and a stick. Emits light level 14. Can be placed on floors, walls, and ceilings. Does not emit light when dropped as an item — it only counts as a light source once placed.
Regular torches can be extinguished in two situations: if a player breaks the block they're attached to, or if a Wandering Trader's llama breaks them (yes, that's a thing that actually happens, and it's as annoying as it sounds). They cannot be removed by weather in the Overworld.
Worth noting: torches in Bedrock Edition behave slightly differently in water. In Java Edition, placing a torch underwater causes it to pop off immediately. In Bedrock Edition, torches can't be placed underwater at all — the game simply won't let you do it.
Soul Torch
Soul torches produce a blue flame and a light level of 10, four levels below a regular torch. That lower output means you need to place them slightly closer together to maintain the same coverage, which costs more materials per square area.
Recipe:
|
Grid Slot |
Item |
|
Top slot |
Soul Sand or Soul Soil |
|
Middle slot |
Stick |
Output: 4 soul torches per craft (same as regular torches).
The light-level trade-off is real, but soul torches have a specific advantage in the Nether: they passively repel Piglins. Piglins are hostile to players without gold armor, and they'll attack on sight in most situations. But they avoid soul fire and soul torchlight. Lining a base or pathway in the Nether with soul torches creates a buffer zone that keeps Piglins at a distance without requiring you to fight them constantly. For anyone building a Nether hub or farm, this is a meaningful quality-of-life improvement.
Soul torches also work underwater in Bedrock Edition — a minor distinction, but one that occasionally matters for underwater builds in Nether fortresses or bastion remnants.
Redstone Torch
Redstone torches are a fundamentally different item despite the shared name. They're crafted with a stick and redstone dust (not coal), produce a dim red glow at light level 7, and their primary function is powering redstone circuits — not lighting spaces.
Recipe:
|
Grid Slot |
Item |
|
Top slot |
Redstone Dust |
|
Middle slot |
Stick |
A light level of 7 is below the mob-spawning threshold in most situations, so redstone torches are not a practical lighting option for anti-spawning purposes. They're circuit components first.
However, redstone torches have interesting mechanical behavior: they power the blocks directly above and beside them, they can be turned on and off by powering the block they're attached to (which inverts their state), and they're central to building NOT gates, clocks, and more complex logic in redstone. That's a whole different topic, but it's worth understanding that a redstone torch in your hotbar is a circuit element, not a light source.
Underwater Torch (Bedrock Exclusive)
In Bedrock Edition only, there's an underwater torch that can be placed and remain lit while submerged. It's obtained through commands or Creative mode rather than standard crafting in survival. For most survival players, this one isn't relevant, but it's worth knowing it exists if you're playing Bedrock and find it in a creative-mode search.
Understanding Light Levels in Minecraft
Light levels are the mechanics behind everything torches do, so understanding them properly saves a lot of frustrated troubleshooting later.
How Light Spreads
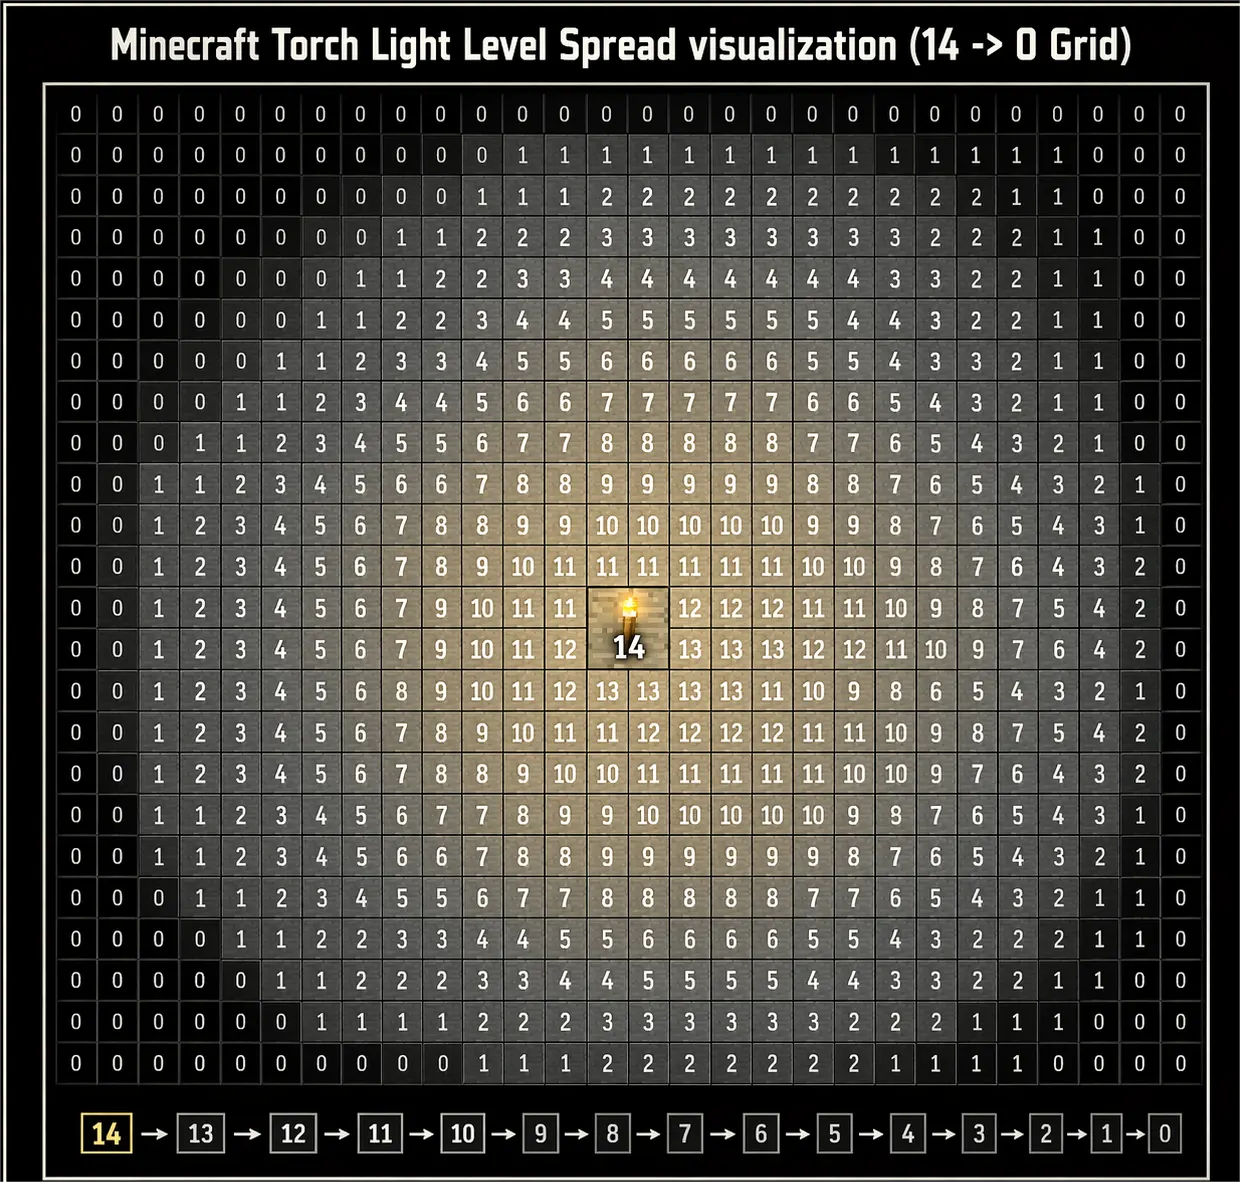
Every light source has an emission value. A regular torch emits 14. From the block containing the torch itself, light spreads outward — dropping by 1 for each block of distance in any direction (up, down, left, right, diagonal). So:
-
The torch block itself: light level 14
-
1 block away: light level 13
-
2 blocks away: light level 12
-
7 blocks away: light level 7
-
13 blocks away: light level 1
-
14 blocks away: light level 0
That 14-block maximum radius sounds like a lot, but walls, floors, and ceilings absorb light. In a narrow tunnel, the light travels along the tunnel but is blocked from spreading through the solid walls. A torch in a 1×2 tunnel illuminates that corridor well, but the moment the tunnel branches, the side branch starts dark immediately.
Sky Light vs. Block Light
Minecraft has two light categories: sky light and block light. Sky light comes from the sun and moon and can reach 15 (full daylight) through open air. Block light comes from placed light sources like torches.
During the day in open areas, skylight prevents mob spawning even without torches. But in enclosed spaces — caves, indoor rooms, enclosed farms — there's no skylight. Block light is all you have, which is why torches matter so much underground and in enclosed structures.
The Mob Spawning Threshold
In Java Edition, hostile mobs spawn on blocks with a block light level of 0. If any block has even 1 point of light, mobs cannot spawn on it.
In Bedrock Edition (post-1.18 update), the mechanic was updated: mobs can only spawn when both sky light and block light are 0. This change made surface spawning less common, but underground behavior is effectively the same since sunlight doesn't penetrate solid ground.
The practical implication is simple: if you can get every block in your mine, base, or farm to a light level of at least 1, no hostile mobs will ever naturally spawn there. The challenge is actually covering every block, because gaps happen easily — under stairs, behind storage, in corners, around uneven terrain.
Checking Light Levels
In Java Edition, pressing F3 opens the debug screen, which shows the block light level of whatever block you're standing on. This is genuinely useful when troubleshooting dark spots. If a corner shows a light level of 0 and you're wondering why mobs keep appearing there, F3 gives you the answer immediately.
In Bedrock Edition, there's no built-in light level display for Survival mode. Players typically use the "do mobs spawn here" test — stand in a spot and see if anything ever spawns — or use texture packs that overlay light levels on blocks.
Strategic Torch Placement: The Actual Skill
Knowing how to craft torches is easy. Placing them efficiently is where most players improve over time.
The Standard Mine Corridor
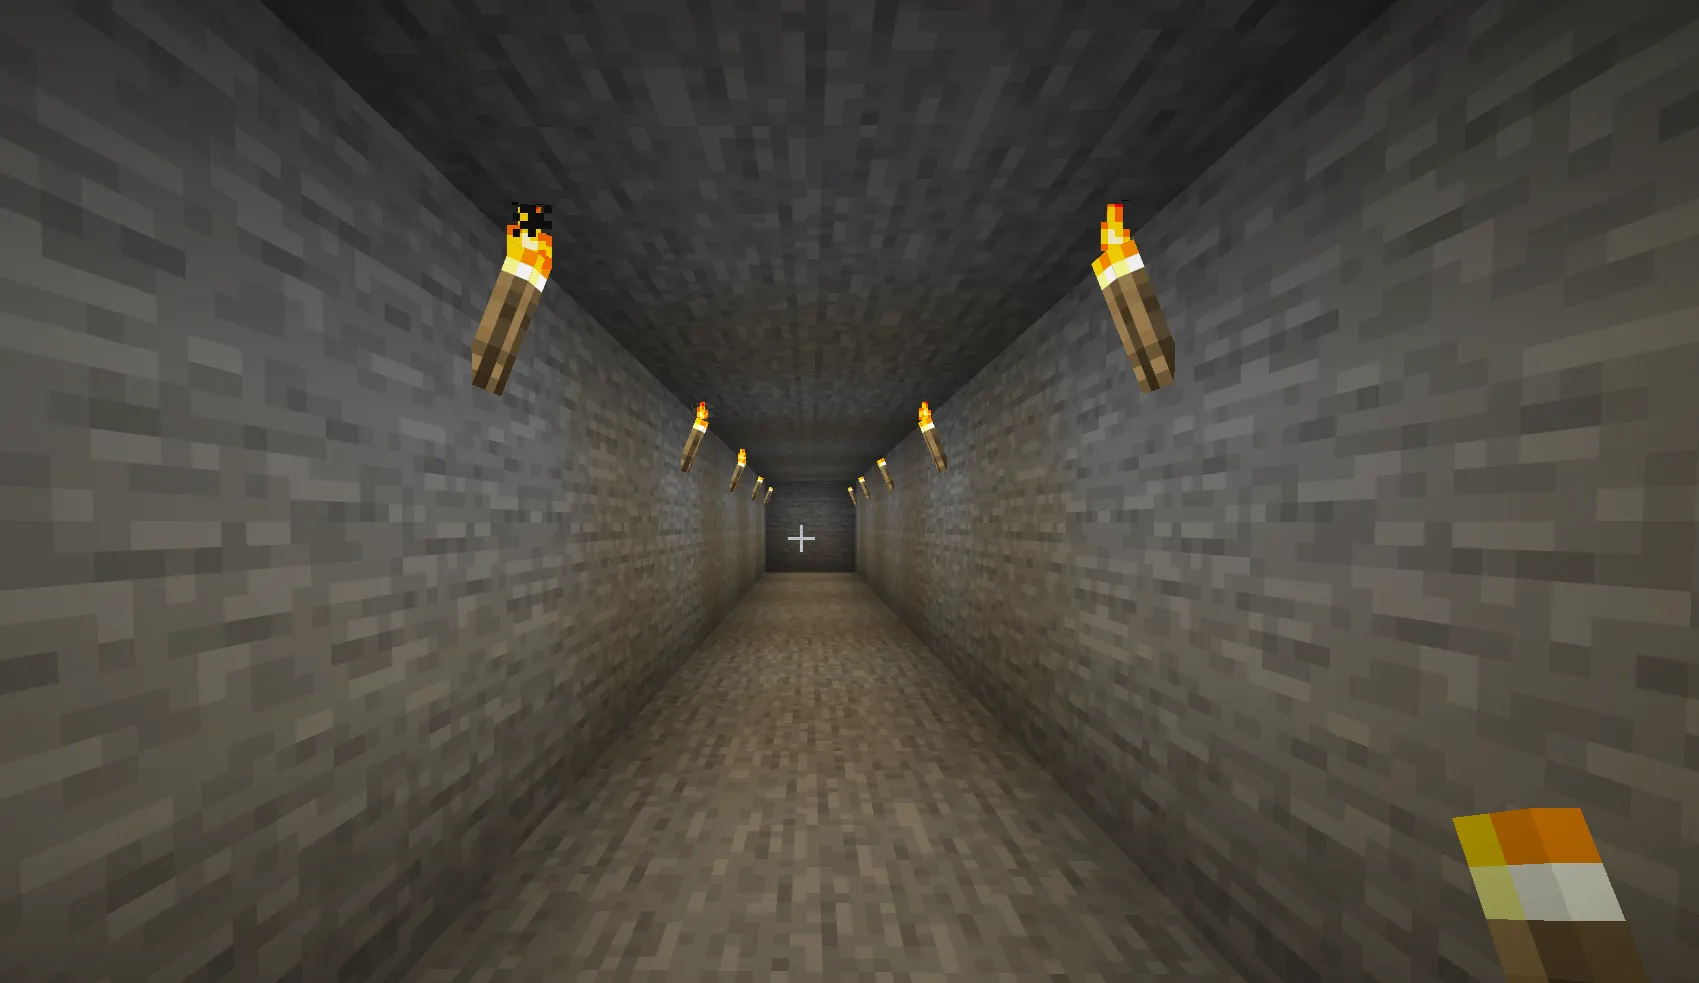
In a straight 1-wide, 2-tall mining tunnel, a torch every 11–12 blocks keeps every block at light level 1 or above. Some players stretch to every 13 blocks and accept a few blocks at 0 in the middle, which can occasionally let a Mob spawn between placements. Playing it safe at 11 blocks is worth the small extra cost.
The Navigation Rule
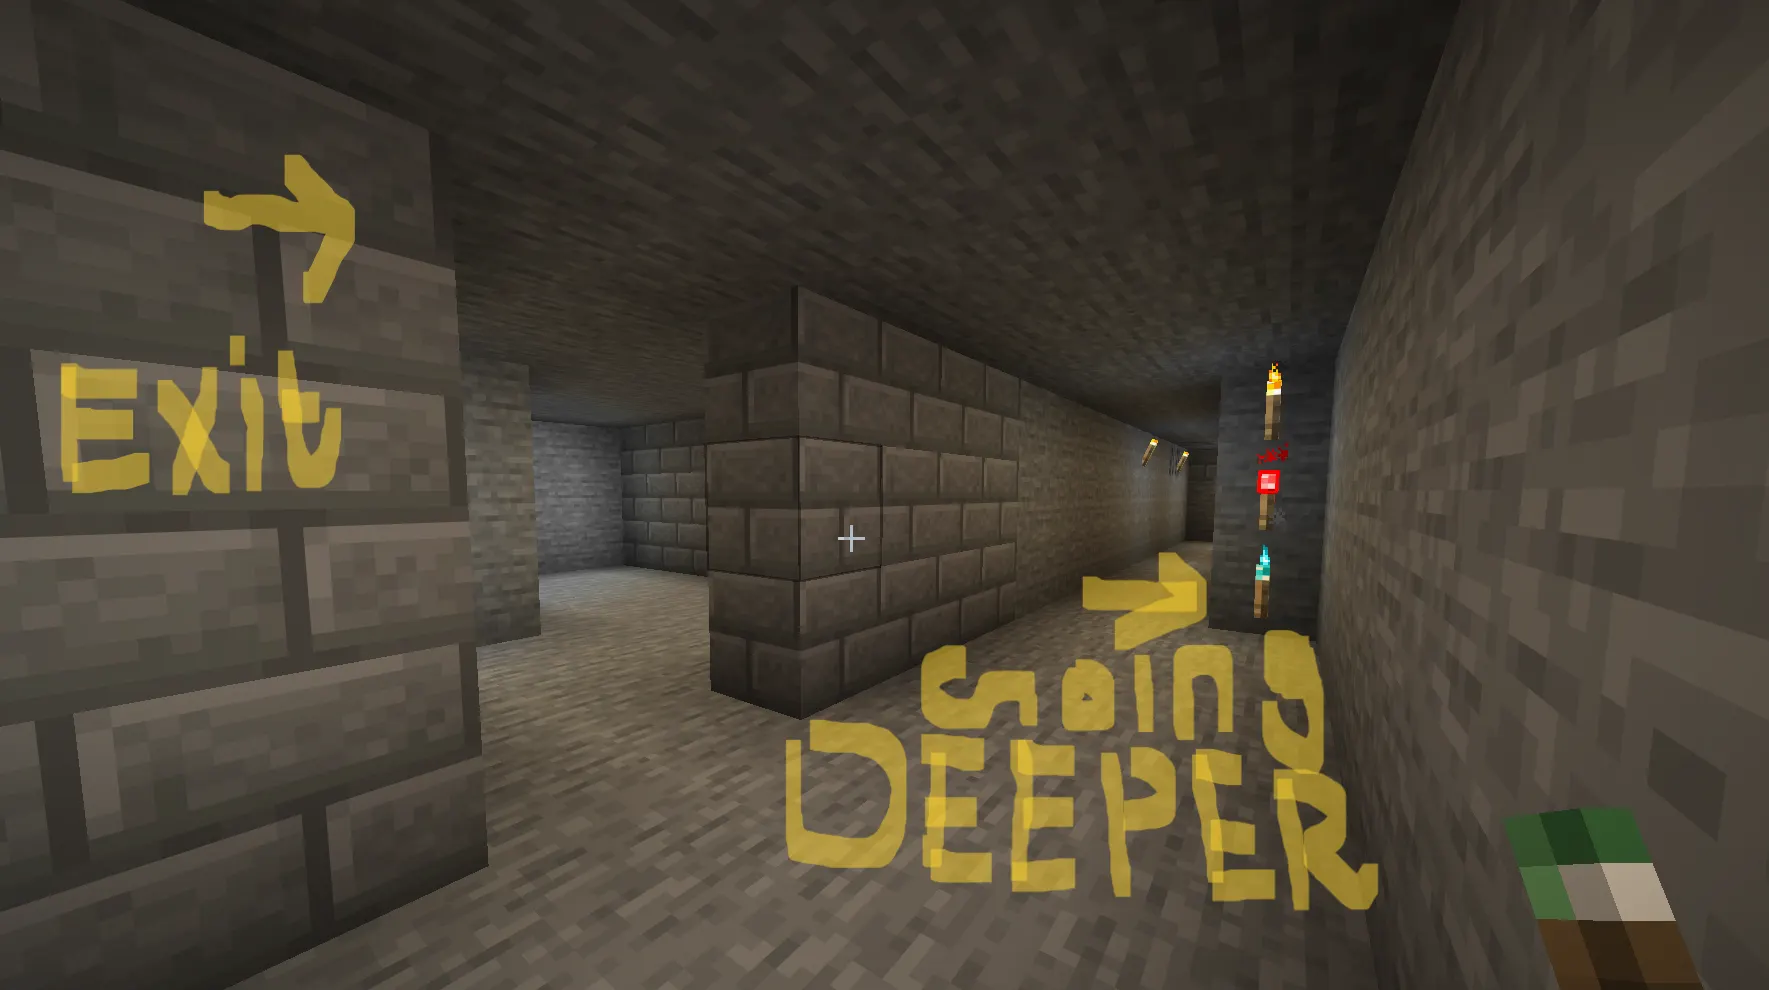
One of the oldest Minecraft tips and still one of the most useful: when mining, always place torches on your right-hand side as you go deeper. On the way back out, they'll always be on your left. This turns torches into a directional marker system — if torches are on your left, you're heading toward the exit. If they're on your right, you're going deeper.
It sounds simple because it is. But underground, especially in a sprawling natural cave system, it's surprisingly easy to get confused about which way leads to the surface. The torch-on-right convention removes that guesswork completely.
Marking Explored vs. Unexplored Branches
Related to navigation: when you reach a branch or intersection in a cave, mark explored paths differently from unexplored ones. A common method is placing a torch on the floor, pointing toward unexplored branches, and a torch on the wall beside paths you've already cleared. Any visual distinction works — the point is you can tell at a glance what you've already covered.
Some players use different blocks entirely (like cobblestone or wood planks) to mark forks, then torches to light the tunnels themselves. Whatever system you pick, use it consistently.
Lighting Large Rooms and Caves
Open spaces are harder to light efficiently than corridors because light has to spread across a 3D volume rather than a linear tunnel.
For square rooms up to 13×13 blocks, a single torch in the center (on the ceiling if possible) can technically reach most of the floor. In practice, corners and walls receive less light than the center, so one central torch rarely eliminates every dark block. Two or three ceiling torches spaced across the room, or wall torches placed in each corner, cover a room reliably.
For large natural cave systems — the kind that open up into vaulted spaces with multiple levels — the ceiling placement strategy is most efficient. Torches placed on high surfaces spread light downward over a wider floor area than torches placed at ground level, which have their spread blocked by uneven terrain and rock outcroppings.
Lighting Farms
Mob farms, crop farms, and animal pens all need different lighting approaches.
For animal and crop farms with flat, predictable surfaces, space torches every 11–12 blocks in a grid pattern. You can map this out with a grid on paper or just walk the farm periodically with F3 open (on Java) to spot any 0-level blocks.
For mob-prevention around a crop farm, the goal is usually different: you want to keep hostile mobs from spawning near the farm area, not necessarily on every block. Perimeter lighting — torches along the outer edges of the farm — handles this if the farm itself is enclosed or has enough ambient light.
For a spawner-based mob farm, the opposite applies: you want one specific room dark (where mobs spawn) and everything else lit. Controlled darkness is a skill in itself. Trapdoors, solid blocks in specific configurations, and careful torch placement keep the spawning room at 0 while surrounding areas stay lit.
Lighting the Nether
The Nether has no sky light and spawns hostile mobs differently from the Overworld. Ghasts, piglins, zombified piglins, magma cubes, and wither skeletons all spawn based on different rules than standard Overworld mobs.
Most Nether hostile mobs spawn regardless of light level in certain biomes. The mob-spawning-prevention benefit of torches is much less reliable there. That said, torches (especially soul torches) are still valuable in the Nether for visibility and Piglin deterrence.
For Nether fortresses and bastions, lighting is about navigation and visibility more than mob prevention. You're still going to fight things — torches just help you see them coming.
Lighting the End
The End dimension is perpetually dark. The main End island has Endermen everywhere, and the outer islands, where you'll find end cities and ships, are similarly dark. Torches help with visibility here, though enderman spawning mechanics don't respond to light the same way regular hostile mobs do — endermen spawn at any light level.
For end city exploration, torch placement is about marking where you've been and being able to see entrances and exits clearly. Practical lighting, not mob prevention.
Torches vs. Other Light Sources: Full Comparison
At some point in a Minecraft world, you'll have access to better light sources. Here's how they all stack up.
|
Light Source |
Light Level |
How to Get |
Best Use |
|
Regular Torch |
14 |
Coal/Charcoal + Stick |
General use, mines, bases |
|
Soul Torch |
10 |
Soul Sand/Soil + Stick |
Neither Piglin deterrence |
|
Redstone Torch |
7 |
Redstone + Stick |
Redstone circuits |
|
Lantern |
15 |
Iron Nuggets + Torch |
Outdoors, ceilings |
|
Soul Lantern |
10 |
Iron Nuggets + Soul Torch |
Neither outdoor paths |
|
Glowstone |
15 |
Nether resource |
Ceilings, decorative builds |
|
Sea Lantern |
15 |
Ocean monument |
Underwater builds |
|
Shroomlight |
15 |
Neither fungi forests |
Decorative, full-brightness |
|
Jack o'Lantern |
15 |
Pumpkin + Torch |
Waterproof lighting |
|
Beacon |
15 |
Post-boss craft |
End-game base marker |
|
Froglight |
15 |
Frogs eating magma cubes |
Decorative, end-game |
|
Magma Block |
3 |
Nether |
Floor lighting (low output) |
|
Campfire |
15 |
Logs + Sticks |
Outdoor, cooking |
A few practical notes from this comparison:
Lanterns are the most natural upgrade from torches. They emit light level 15, can be hung from ceilings or placed on the ground, and — unlike torches — cannot be knocked off by a block being broken underneath them. Once you have a reliable iron source, replacing outdoor torches with lanterns is worth it purely for the stability.
Glowstone is common once you're farming the Nether, and it produces maximum brightness while looking good in builds. The downside is that you need Nether access, so it's not an early-game option.
Sea lanterns are obtained from ocean monuments, which are mid-to-late game content. They produce max light and work underwater natively, making them the best choice for any underwater structure.
Jack o'Lanterns are underrated. They're crafted by placing a lit pumpkin on top of a torch in the crafting grid (or a torch under a carved pumpkin), produce light level 15, and are completely waterproof. They're also fairly cheap once you have a pumpkin farm running. For underwater builds in the Overworld, they're often easier to obtain than sea lanterns.
Campfires emit maximum brightness but are bulky, produce smoke particles, and deal damage to mobs or players that walk on them. Not practical for interior lighting, but good for outdoor signaling and aesthetics.
Common Mistakes Players Make With Torches
Spacing Torches Too Far Apart
The most common issue. A torch every 15 or 16 blocks leaves dark spots between placements where light drops to 0. Players see everything looking reasonably lit and assume they're covered. They're not. If something spawns in your mine and you can't figure out where it came from, check the middle distance between your torches.
Ignoring Ceiling Height
In a tall cavern or a base with high ceilings, torches placed at floor level don't spread light upward efficiently. The ceiling stays dark. Nothing spawns on a ceiling, so you might think it doesn't matter — but the light level drops on the floor beneath the unlit ceiling can still create spawning zones. Ceiling-placed torches or lanterns in tall rooms are more efficient because they spread light downward over more floor area.
Not Lighting Underneath Structures
Building a base on stilts, or a farm raised off the ground? The space underneath is dark. Mobs spawn underneath raised platforms constantly if you leave that area unlit. Always light the underside of any structure that has open space beneath it.
Over-relying on Torches in the Nether
The Nether has mob spawning rules that don't respond to light the way the Overworld does. Some players pour torches everywhere in a Nether base and still have mobs appearing because the spawning mechanics there are different. In the Nether, walls, floors, and spawn-proofing blocks matter more than lighting alone.
Forgetting Torch Limits in Water
A torch breaks instantly underwater in Java Edition. Players sometimes try to light underwater passages with torches, watch them pop off, and get confused. For underwater lighting, use glowstone, sea lanterns, jack o'lanterns, or conduits.
Advanced Torch Tips
Fortune Enchantment and Coal Mining
If you're stockpiling coal for large-scale torch production, mining with a Fortune III pickaxe is more efficient than mining with an unenchanted one. Each coal ore can drop up to 4 coal with Fortune III, compared to exactly 1 without. In a single mining session, this can multiply your torch material output dramatically.
Using Torches to Pop Sand and Gravel
Torches have a useful physics interaction: if you place a torch on the ground and then let sand or gravel fall on it, the falling block breaks on contact with the torch and drops as an item. This is used to farm large quantities of sand or gravel quickly — set up a tall column, place a torch underneath, and let the whole column break at once. It's a standard survival technique that saves a lot of manual mining.
Torches as Temporary Scaffolding
Experienced players use torches as a quick scaffolding trick. Dig out a spot in a wall one block deep, place a torch, jump, and use the torch as a platform for a split second to gain height. This doesn't work everywhere and requires precise timing, but in tight spots without actual scaffolding materials, it can help you reach a block you couldn't otherwise get to.
Breaking Torch Habits for Mob Farms
If you're building a mob farm that requires a dark spawning room, you need to be very deliberate about where you don't place torches. A common mistake is reflexively placing torches while building, then wondering why your spawning room isn't working. In areas intended to be dark, keep torches completely out and use another method (like a lever-controlled piston or a trapdoor) to navigate safely.
Torch Stacking for Rapid Lighting
When you need to light a large area quickly — a new cave discovery, a wide-open biome you're claiming — you can place torches rapidly by holding right-click while moving. This lets you leave a trail of torches at consistent intervals without stopping. Combined with the navigation convention (right side going in), you can light an entire cave network in minutes.
Torch Crafting in Different Game Modes
Survival Mode
Everything in this guide applies directly. Materials matter, crafting matters, and efficient placement saves resources. Torches in survival are a renewable resource — you'll always have wood for sticks, and coal regenerates in every world with new terrain generation — but they still cost time and inventory space to produce at scale.
Hardcore Mode
Same mechanics as survival, but with the stakes much higher. Running out of torches deep in a cave in hardcore is a real danger — you lose visibility, get turned around, and hostile mobs start spawning in the dark around you. Hardcore players typically carry absurd quantities of torches (3–4 full stacks minimum) before any serious caving session. The resource investment is worth it completely.
Creative Mode
Torches are in the creative inventory under the Lighting section. Unlimited, free, no crafting required. Useful for quickly testing light coverage in a build before committing to a layout in survival.
Conclusion
Torches are one of those items that start simple and reveal more depth the longer you play. The recipe is coal plus a stick. Four torches per craft. No crafting table needed. That's what every beginner needs, and it takes about 10 seconds to learn.
But the deeper you get into Minecraft, into large cave networks, Nether exploration, mob farms, massive bases, end-game automation, the more you realize torches are less about lighting and more about control. Control over where mobs spawn. Control over your navigation underground. Control over which parts of your world are safe and which aren't.
Understanding light levels, placing torches intentionally rather than randomly, knowing when to switch to soul torches or lanterns or glowstone, these are the things that separate players who are always fighting mobs from players who rarely see one inside their own base.
The recipe is two items. The skill is knowing what to do with it.